Saturday 22 April 2017

Battle for Braaga 2 - Engagement

The battle opened with a few shells from West Friesland (off table) medium artillery dropping on the edge of the town. One salvo reduced a damaged building to mostly rubble and a couple dropped into established depressions, turning them into muddy craters as the long range guns sought to set up programmed fire points from advice being passed from the command unit on Fuchsschwarz Hill to the right rear flank of West Friesland lines.
West Friesland battle lines move 1.

The sound of gunfire and explosive detonations covered the sound of tanks and other vehicles revving up as the West Friesland assault commenced.

After an initial soft advance by the West Friesland forces, the central column began to move in earnest on the town whilst overhead, spotter aircraft hummed noisily, overflying the enemy positions.  Whilst already installed East Friesland men held position, the arriving Hessnovinians began to unload men and equipment from vehicles.
Transports start to unload

Soft vehicles park and unload men
West Friesland forces advance steadily
As the West Friesland column moved up, confident as no East Friesland weapons had yet been able to penetrate the armour even on the PZI other than the threat of artillery fire, rifles cracked from the roof of a building as snipers tried to strike at the advancing infantry. A moment later, the first shell from a 2pdr battery in the town struck close to the advancing vehicles. Undaunted, the West Frieslanders pushed on.
West Friesland Column reaches the outskirts of town
First casualties were taken by the advancing West Friesland column as sniper fire from the roofs of the buildings on the edge of town hit troops as they emerged from the trees.  A few moments later, the PZ1 machine guns rattled as it moved out into the street and the radio officer called down artillery fire on the sniper positions and now it was East Friesland men that fell.
West Friesland Recon. head back to forward airfield.

Meanwhile, the Hessnovinian force had moved into several buildings and was moving into position to strike.  West Friesland aircraft in the form of a squadron of Fokker biplanes whirred overhead, carrying out vital reconnaisance. Having spotted the T34 tanks and movement of troops from soft vehicles, the aircraft turned swiftly and headed for the advance airfield where they could deliver their reports to the West Friesland command.
Hessnovinian forces advance to edge of Braaga
A general advance order had been issued by the West Friesland commander, Lt Colonel Kruger resulting in a push forward by the two units with armoured cover and the forward observer unit which now moved towards the woods on the left flank, hoping to get a good look at the East Friesland battle lines.
West Friesland units respond to general advance order.
Fwd Observer unit moves towards woods on edge of town.

Colonel Uri Czherjenko, the comander of the Hessnovinian forces and, nominally, what remained of East Friesland men, had taken up a room in the smithy and garage from which he could direct the defence of Braaga.
Base of Hessnovinian Ops. Artillery unit stands by.
Despite receiving intelligence from the aerial recon, Kruger was unable to use the information to change the course of a battle he had now committed forces to. With the 1st Platoon, Hawk Company advanced to the town's edge, he could not bring long range artillery to bear on the Hessnovinian armour.  The PZ1 having made a dash forward, now recoiled as a T34 loomed into view and fired a shell that missed closely. As the Hawk Company moved in to attack Hessnovinian and East Friesland positions, a second T34 moved into a defilade where artillery fire had left a crater. Unable to go forward or back without offering a target, the PZ1 and advance troops tried to push into Braaga.
Exchange of tank fire
 A moment later, the inevitable happened as the PZ1 was hit in the flank by the 7.62cm cannon of a T34 and was knocked out.  A PZIII shell bounced off the T34 which backed off into a sidestreet but the initial success of Hawk Company's platoon in attacking the East Friesland artillery position turned sour as they were overrun and took heavy casualties in a firefight with advancing elements of the Hessnovinian 24th Motorised and those within the Hessnovinian field HQ overlooking that position.

An assault by West Friesland 2nd Platoon on the white house over on the left flank was beaten off with casualties on both sides but the West Friesland troops took the heavier damage.  Meanwhile, the East Friesland armoured car moved out to rake the 3rd Hawk Company Platoon with fire which was also backed by more sniper and now machine pistol rounds from buildings on the edge of the town.

The 24th Motorised were now in complete control on their right flank having defeated the West Friesland assault. The white house was re-enforced and the ruins behind it, to further consolidate the hold.
On the edge of the wood, West Friesland forces fell back in the face of resistance and superior armour facing them.  The mortars dropped a few shells on positions believed to be held by the Hessnovinians but it was becoming clear that Braaga was too well held to fall as previous settlements had.  The West Friesland forces needed to regroup and consider the impact of finally facing armour and troops that could not be easily overrun.
To add to West Friesland woes, the PZIV that had been heading the advance on the West Friesland left flank was hit by a T34 and brewed up as the shell penetrated the front armour. No East Friesland weapons had been able to damage a PZ armour unit since the action began. Suddenly, the boot was on the other foot.

That signalled the end.  Kruger, seeing he had lost over half of his armour and the best part of two platoons, withdrew his forces leaving Czherjenko in control of Braaga. It was the first engagement featuring these two leaders in a new phase of the war.

Monday 13 March 2017

East Friesland - Battle for Braaga

After the fall of Kovoska, the East Friesland forces were driven back swiftly by the Barovian backed West Friesland army.  Only when assistance arrived from The People's Republic of Hessnovinia began to reach the front line, were the East Frieslanders able to start putting up resistance.

This battle takes place nearly 3 months into the war. A single platoon of East Friesland troops hold the outskirts of Braaga against the onrush of the West Friesland advance.
 
A small platoon take positions along the western edge of Braaga
Outdated East Friesland guns await the order to fire.
 A full company of West Friesland men have arrived in the form of four platoons and a command unit backed up by Barovian armour and guns. They have complete air superiority, allowing the West Friesland bi-planes to fly freely, dropping small bombs, carrying out reconnaisance and strafing targets.
West Friesland platoon with PZIII
West Friesland platoon with old PZIV

Unbeknown to either force, a Hessnovinian company is about to push into Braaga to support their East Friesland allies with armour and vehicles. This element of the 24th Motorised Brigade is just one of the new entrants into the war that are about to change the one sided nature of the conflict.
Hessnovinian C Platoon with half tracks and scout car

Watching his troops advance, Lt Colonel Marc Kruger, in command of the West Friesland forces, signals the light artillery to prepare to fire on targets provided by the forward observers.
West Friesland Command Unit wait on a wooded hill

PAK artillery waiting for fire orders
The West Friesland 1st Platoon of Hawk Company of the 11th Battalion advance along a narrow track while elements of the 2nd Platoon, gunnery and observation close in on a deserted warehouse.
1st platoon  Hawk Company- West Friesland 11th Battalion

Forward Observation Team advance position.
On the eastern edge of the field, the Hessnovinian commander, Colonel Uri Czherjenko commandeers a building with attached garages and orders A and B platoon to move up.
Hessnovinian A Platoon unload in front of command building
B platoon with T34s move up also.
(The picture above shows the platoons gathering. The figures on the right are the command group - where figures placed against a building, they will be considered inside.)

West Friesland had complete air superiority at this stage of the conflict.
Thus the stage was set for the first clash involving Hessnovinian troops directly and one that would lead to a further escalation as Barovian units would respond in kind within a month of this.  On the East Friesland side, then, one platoon of EF light infantry with soft transport, 3 platoons plus command unit, Hessnovinian 24th Motorised Brigade plus 2 half tracks, one armoured patrol car, 2 x T34 main battle tanks and 2 soft vehicles.   On the West Friesland side, 3 standard platoons and 1 artillery platoon with PAK88 gun, 1 command unit with soft transport and command vehicle, 1x PZ1, 1xPZIII, 1xPZIV, 1 half-track, 3 x Fokker Bi-Planes with 2 AP bombs and machine guns. 

The objective - control of Braaga.  This battle represents one small slice of the greater conflict for the town and, as normal in such campaigns as this, the outcome will decide the overall result of this phase of the struggle for the town.  To be continued.....

Friday 10 March 2017

Hardican Civil War Move 2.2

2.2 Ten Days in May - Manouvres and Money
After retiring from the field and having to gather his forces again, which took a couple of days, Marquess Raffham, Thomas Kirby temporarily split his forces, recruiting an infantry unit out of Raffham and a cavalry unit from Stanton Brimard. Uncertain of the how secure Farren Mill was, he decided against another unit directly from there. Marching with the two Raffham units and artillery, Kirby headed to Maidenpool and sat down there to bring the town under Parliamentary control. He was forced to find new recruits for the scout cavalry which was suffering from a dip in morale after being chased off the field.

Sir Clive Camberwell rode across country to Stanton Brimard, where he raised a new horse unit, leaving Sir Lyall Wetherick to march the foot units into Farren Mill and assume control, there. 

Lord Stewart, doubting that Langley would attempt another move nortwards until he had a substantially more powerful force, left Major Edward Delaney and the 1st Keswick at Candleridge and marched on Turnwall, taking the artillery with him as the partially walled town may resist efforts to bring it under control.  Not everyone in Turnwall was ready to submit to demands from Parliament and a local militia quickly took possession of the gates and walls, resisting the initial attempt to seize the town.  Stewart, irritated by this, deployed the artillery and began the business of reducing the defence.

In Greysby, Connal Murray and his highlanders soon had the town subdued and marched in to demand taxes towards the Parliamentary cause. Sir Owen Kentigern had taken a role as second in command under Murray and seemed to be satisfied with this. They established a camp just west of the main town and began to plan an attack on Rivenbridge. Murray's fanatics were impatient to be away and making war against Barret, Campbell and Laidlaw all of whom they regarded as traitorous.

In the south, Kirby was concerned for the force holding at Frinton and sent orders that Sir Henry Tremayne should organise a horse unit immediately and then consider raising more troops to ensure that they could defend themselves until help arrived from the north.

Langley and his forces had not been idle, either.  The Republicans desperately needed funds. Hopton had begun bombarding Hornborough castle with the refusal of the town or the Earl of Easthold to surrender up taxes and territory. The ex-royalist, Sir Fengrove Parry occupied the castle, closed the gates of the town and using his militia and local guards, stood firm. 

Sir Geoffrey Morton had marched from Newchurch but finding the way blocked by the forces at Frinton, went north across country and set up an encampment about twenty miles east of Eden Wells, sending letters to Sir Percival Blake, emploring him to join their cause. Blake had been a royalist who changed sides to support Parliament and since, had become an active political figure. The only issue was that, while he got on well enough with Morton and Hopton, he showed a distaste for Charles Langley.

Finding no gains out of either of these manouvres, Langley himself sent word to Hopton who purchased a supply train and sent spare coin as well as hay, vegetables and fruit to help out Langley's pressured position.  Using some of the coin, Langley had Sir Paxton Gilbert recruit a foot unit from Stourwold and both marched to meet at Wilcombe, which they swiftly took despite some protests from Sir Landon Fitzwalter, who was related to the Parliamentarian, Sir James Fitzpatrick. 

In the north, Barrett's forces were running out of coin and supplies. He had to gamble on Murray not making an immediate advance, despatching Campbell to Albridge to bring that small town under their aegis and, leaving Laidlaw to hold Rivenbridge, Barrett rode to Edenwood to approach Sir Stafford Le Grange who leaned towards Langley although he had also been a royalist politician. Fortunately for him, Campbell put down any resistance from Albridge in his usual harsh manner and Le Grange responded positively, making it clear that he did not want to see Kirby and his "left-wing populists" in control of the state.  The addition of Edenwood and Albridge gave Barrett access to a usable war chest and the army could be paid. Le Grange lost no time in raising men at Edenwood and by the end of the period, they were ready to head back to Rivenbridge while Campbell camped outside Albridge.

Wednesday 1 March 2017

Battle of Farren Mill - Hardican Civil War

Continuing move 2.1...
The clash at Farren Mill brings the two faction leaders face to face on the field for the first time. Marching from the north to reach the small town first are Kirby's Parliamentarian force combining the Stanton Brimard First and Second foot with his own Raffham Scout Cavalry and Sir Lyall Wetherick's hurriedly raised Farren Mill Reserve. Short on horse, Kirby takes up a defensive position around the mill digging in light cannon.

The Earl of Sedgewater, Sir Charles Langley arrives from the south, the road swinging west so his forces approach from the east of Farren Mill.  He has two units of foot from Brindley plus cavalry in the form of the First Stourwold horse and the Penfield Light Horse. He advances in standard formation with one cavalry unit on each flank.

Neither force is very large so this promises to be a swift skirmish and one that will decide initial ownership of Farren Mill with its useful position on the road into the Vale of Wells. Additionally, victory for Langley would grant him access to other potential towns. Victory for Kirby would free Lord Stirling to move on the neutral town of Turnwall and possibly on to Stanport.

Kirby sends his Raffham Scout Cavalry into the town to seek out Langley's forces. At the same time, Langley orders Sir Miles Wolfden to take the Penfield Light Horse and ensure that the churchyard is clear of any artillery or other firing position and then proceed down the lane to the town.
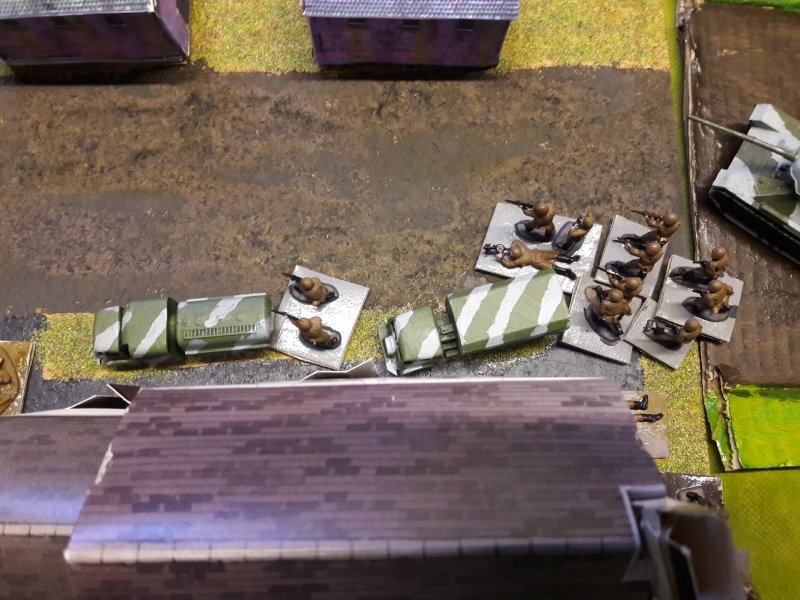
The Stourwold Horse, meanwhile, cross the river and enter the town, encountering the Raffham Scout Horse whereupon a swift skirmish occurs.
In the centre of the field, the two Brindley foot units approach the position now held by the Stanton Brimard 1st foot.
Realising that the Raffham Scout Cavalry were no match for a full cavalry unit, the Raffham retreated, drawing the Stourwold Cavalry in pursuit. This allowed the artillery to fire on the Stourwold but the shots went wide. The Farren Mill Reserve then interposed themselves forcing the Stourwold horse to stop and melee while the Raffham Scout horse halted and rallied.
The foot units moved in, firing muskets with little effect. The Stanton Brimard 2nd foot swung about and approached from the north while the 1st foot held position on the lane, using the trees and slopes as cover. The Penfield Light Horse having entered the churchyard unopposed, swung around the church and entered the lane.
This forced Langley to order the Brindley 1st Foot to turn and engage the approaching Stanton Brimard 2nd, thus losing his temporary advantage in numbers in the centre. A long struggle then ensued between the units engaged, even when the Penfield Horse rode by, raking the Stanton Brimard 1st with pistol and blunderbuss fire.

Slowly, as men tired and wounds were taken, the Stanton Brimard 1st started to push the Brindley 2nd back. The Stanton Brimard 2nd did not fare as well, however, as they were losing the pushing and shoving match with the Brindley 1st. The Brindley 2nd retreated into the town.

At the same time, the Farren Mill Reserve, which had been losing ground against the Stourwold Horse but had held, because Kirby was present to rally them, now broke and fled the field altogether. The Stourwold Horse went after them and also left the field.  By this time, the Penfield Light had arrived and halted to get into good order. They now clashed with the Raffham Scout horse which was protecting the artillery.  Once again, the guns failed to make any impression on the advancing Penfield unit which took some minor wounds from grapeshot but were not affected.

In the town, General Langley, mastermind of the 1st Civil War tried to rally the Brindley 2nd but his words seemed to cause the already panicked unit to lose it's way altogether and the men broke and ran for the road out of the town. Langley, seeing he would be exposed by this event, withdrew from the field.
A similar scenario was being enacted just west of this where the Raffham horse were pushed back and General Kirby retreated with the remainder of that unit pursued for a short distance by the Penfield Light.
The Brindley 1st had succeeded in forcing the Stanton Brimard 2nd to break and retreat but when Sir Clive Camberwell, veteran of the first war rallied the Stanton Brimard troop, it turned to face the Brindley 1st again. 
Seeing that they had no support and that their commander was leaving the fray, Major William Clayton ordered the Brindley 1st to back off and they then marched off the field in good order. The Stanton Brimard 2nd remained near the church, glad not to have to fight on. They had taken losses and most of the men were desperately tired.

The battle was inconclusive but Farren Mill remained in Parliamentary Democrat hands. Both generals retired to consider their next move. Sir Lyall Wetherick, having fled with his reserves, eventually turned up at Raffham with little more than his horse and weapons.


Wednesday 8 February 2017

Hardican Civil War - Move 2.1

After a poor start to their campaign, the Democrat/Presidential faction needed to make headway or face the possibility of forces abandoning their cause as they ran out of income.
While they held a proportion of the South-East, their grip was tenuous whereas the Parliamentary/Republican forces had a strong presence in the North and Midlands.


The map on the left shows the holds with green for Langley's Presidentials and blue for Kirby's Parliamentarians.

Utilising his strong treasury, Sir Ralph Hopton diverted coin to supporters in Newchurch and Barfold.  In Newchurch, Sir Geoffrey Morton, a long time supporter of Langley, receiving coin and orders to raise men, quickly equipped a foot unit and moved to secure Newchurch for the faction. His planned orders would then set him to march to join Langley.  Sir Francis Manderley, meanwhile, had raised a unit of horse but was not in a position to seize the contested town. His orders were to march to Hornborough, meeting with Hopton who now departed St Martins with a view to taking control of the castle

Charles Langley, feeling strongly that he had to give a lead to his supporters, gathered his forces and marched on Farren Mill, a known Parliamentarian/Republican town. In response, having been alerted to the movement of Langley's force,Thomas Kirby, Marquess Raffham sent immediate orders to Sir Lyall Wetherick in Farren Mill to raise what troops he could. He then set off on a forced march southwards, intent on reaching Farren Mill before Langley.  The result was the first battle involving the two leaders of the factions as they fought for control of the strategically placed town.

Farren Mill from the west.


Lord Stewart remained in place at Candleridge, Kirby feeling that this held a good defensive position against any further advance northwards by Langley should he win at Farren Mill and press onwards. 

Murray and his largely Highland force now marched south, seizing Greysby and prepared to march on Rivenbridge.

Realising the need to hold at Rivenbridge, Barrett sent for help from Langley's lands in Sedgewater.  Sir Wallace Campbell, who had created such a problem in the glens accepted a request to ride to Albridge where he persuaded the guilds and shrieve to demonstrate their loyalty by raising a militia (Albridge Foot) of mainly pikemen to march north in support of holding Rivenbridge.


Monday 16 January 2017

The Old School House Siege

So.....what a long break from the blog and the wargames table. Life isn't quite as simple as it used to be and priority had to be given elsewhere for a while but here I am, back again to indulge my interests in public;

The Old School House Siege is the second part of a skirmish between invading West Friesland military, a facist power with extensive military capabilties and communist East Friesland.  West Friesland had been bringing troops in on cargo ships for weeks when they launched this assault.  Beset by better armed men, the East Friesland military police battle to retain control of their parliament house.  Meanwhile, ministers slip across the rear lawn to safety.

West Friesland troops push forward


By this stage, the East Friesland MP had lost most of the vantage points. A mortar was shelling them from the hill and reports were coming in that more West Friesland troops had arrived on the outskirts and were now advancing into the railway yards and factory areas of the city.

As the East Friesland force gathered about the Old School House, trying to make best use of sandbags and defensive points, one of the APCs took a serious hit from the PZ1 causing it to catch fire. Moments later, it had brewed up and stood useless, aflame in front of the building.

The mopping up began shortly after. West Friesland troops took up positions all around, including on advantageous roofs and balconies. A last hard core of the communist MPs fought bravely on until the last, making West Friesland pay for the ground but the Parliament building had fallen and a bitter blow had been struck by the old enemy.

Meanwhile, the loss of the majority of the East Friesland fleet had enabled the invasion to move on at a pace backed by the Facist Alliance.  However, the Peoples Republic of Hessnovinia had gathered a fleet task force including a number of troop ships ready to come to the aid of their much smaller ally.