Monday 13 March 2017

East Friesland - Battle for Braaga

After the fall of Kovoska, the East Friesland forces were driven back swiftly by the Barovian backed West Friesland army.  Only when assistance arrived from The People's Republic of Hessnovinia began to reach the front line, were the East Frieslanders able to start putting up resistance.

This battle takes place nearly 3 months into the war. A single platoon of East Friesland troops hold the outskirts of Braaga against the onrush of the West Friesland advance.
 
A small platoon take positions along the western edge of Braaga
Outdated East Friesland guns await the order to fire.
 A full company of West Friesland men have arrived in the form of four platoons and a command unit backed up by Barovian armour and guns. They have complete air superiority, allowing the West Friesland bi-planes to fly freely, dropping small bombs, carrying out reconnaisance and strafing targets.
West Friesland platoon with PZIII
West Friesland platoon with old PZIV

Unbeknown to either force, a Hessnovinian company is about to push into Braaga to support their East Friesland allies with armour and vehicles. This element of the 24th Motorised Brigade is just one of the new entrants into the war that are about to change the one sided nature of the conflict.
Hessnovinian C Platoon with half tracks and scout car

Watching his troops advance, Lt Colonel Marc Kruger, in command of the West Friesland forces, signals the light artillery to prepare to fire on targets provided by the forward observers.
West Friesland Command Unit wait on a wooded hill

PAK artillery waiting for fire orders
The West Friesland 1st Platoon of Hawk Company of the 11th Battalion advance along a narrow track while elements of the 2nd Platoon, gunnery and observation close in on a deserted warehouse.
1st platoon  Hawk Company- West Friesland 11th Battalion

Forward Observation Team advance position.
On the eastern edge of the field, the Hessnovinian commander, Colonel Uri Czherjenko commandeers a building with attached garages and orders A and B platoon to move up.
Hessnovinian A Platoon unload in front of command building
B platoon with T34s move up also.
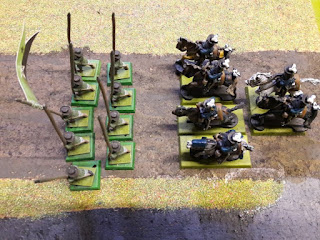
(The picture above shows the platoons gathering. The figures on the right are the command group - where figures placed against a building, they will be considered inside.)

West Friesland had complete air superiority at this stage of the conflict.
Thus the stage was set for the first clash involving Hessnovinian troops directly and one that would lead to a further escalation as Barovian units would respond in kind within a month of this.  On the East Friesland side, then, one platoon of EF light infantry with soft transport, 3 platoons plus command unit, Hessnovinian 24th Motorised Brigade plus 2 half tracks, one armoured patrol car, 2 x T34 main battle tanks and 2 soft vehicles.   On the West Friesland side, 3 standard platoons and 1 artillery platoon with PAK88 gun, 1 command unit with soft transport and command vehicle, 1x PZ1, 1xPZIII, 1xPZIV, 1 half-track, 3 x Fokker Bi-Planes with 2 AP bombs and machine guns. 

The objective - control of Braaga.  This battle represents one small slice of the greater conflict for the town and, as normal in such campaigns as this, the outcome will decide the overall result of this phase of the struggle for the town.  To be continued.....

Friday 10 March 2017

Hardican Civil War Move 2.2

2.2 Ten Days in May - Manouvres and Money
After retiring from the field and having to gather his forces again, which took a couple of days, Marquess Raffham, Thomas Kirby temporarily split his forces, recruiting an infantry unit out of Raffham and a cavalry unit from Stanton Brimard. Uncertain of the how secure Farren Mill was, he decided against another unit directly from there. Marching with the two Raffham units and artillery, Kirby headed to Maidenpool and sat down there to bring the town under Parliamentary control. He was forced to find new recruits for the scout cavalry which was suffering from a dip in morale after being chased off the field.

Sir Clive Camberwell rode across country to Stanton Brimard, where he raised a new horse unit, leaving Sir Lyall Wetherick to march the foot units into Farren Mill and assume control, there. 

Lord Stewart, doubting that Langley would attempt another move nortwards until he had a substantially more powerful force, left Major Edward Delaney and the 1st Keswick at Candleridge and marched on Turnwall, taking the artillery with him as the partially walled town may resist efforts to bring it under control.  Not everyone in Turnwall was ready to submit to demands from Parliament and a local militia quickly took possession of the gates and walls, resisting the initial attempt to seize the town.  Stewart, irritated by this, deployed the artillery and began the business of reducing the defence.

In Greysby, Connal Murray and his highlanders soon had the town subdued and marched in to demand taxes towards the Parliamentary cause. Sir Owen Kentigern had taken a role as second in command under Murray and seemed to be satisfied with this. They established a camp just west of the main town and began to plan an attack on Rivenbridge. Murray's fanatics were impatient to be away and making war against Barret, Campbell and Laidlaw all of whom they regarded as traitorous.

In the south, Kirby was concerned for the force holding at Frinton and sent orders that Sir Henry Tremayne should organise a horse unit immediately and then consider raising more troops to ensure that they could defend themselves until help arrived from the north.

Langley and his forces had not been idle, either.  The Republicans desperately needed funds. Hopton had begun bombarding Hornborough castle with the refusal of the town or the Earl of Easthold to surrender up taxes and territory. The ex-royalist, Sir Fengrove Parry occupied the castle, closed the gates of the town and using his militia and local guards, stood firm. 

Sir Geoffrey Morton had marched from Newchurch but finding the way blocked by the forces at Frinton, went north across country and set up an encampment about twenty miles east of Eden Wells, sending letters to Sir Percival Blake, emploring him to join their cause. Blake had been a royalist who changed sides to support Parliament and since, had become an active political figure. The only issue was that, while he got on well enough with Morton and Hopton, he showed a distaste for Charles Langley.

Finding no gains out of either of these manouvres, Langley himself sent word to Hopton who purchased a supply train and sent spare coin as well as hay, vegetables and fruit to help out Langley's pressured position.  Using some of the coin, Langley had Sir Paxton Gilbert recruit a foot unit from Stourwold and both marched to meet at Wilcombe, which they swiftly took despite some protests from Sir Landon Fitzwalter, who was related to the Parliamentarian, Sir James Fitzpatrick. 

In the north, Barrett's forces were running out of coin and supplies. He had to gamble on Murray not making an immediate advance, despatching Campbell to Albridge to bring that small town under their aegis and, leaving Laidlaw to hold Rivenbridge, Barrett rode to Edenwood to approach Sir Stafford Le Grange who leaned towards Langley although he had also been a royalist politician. Fortunately for him, Campbell put down any resistance from Albridge in his usual harsh manner and Le Grange responded positively, making it clear that he did not want to see Kirby and his "left-wing populists" in control of the state.  The addition of Edenwood and Albridge gave Barrett access to a usable war chest and the army could be paid. Le Grange lost no time in raising men at Edenwood and by the end of the period, they were ready to head back to Rivenbridge while Campbell camped outside Albridge.

Wednesday 1 March 2017

Battle of Farren Mill - Hardican Civil War

Continuing move 2.1...
The clash at Farren Mill brings the two faction leaders face to face on the field for the first time. Marching from the north to reach the small town first are Kirby's Parliamentarian force combining the Stanton Brimard First and Second foot with his own Raffham Scout Cavalry and Sir Lyall Wetherick's hurriedly raised Farren Mill Reserve. Short on horse, Kirby takes up a defensive position around the mill digging in light cannon.

The Earl of Sedgewater, Sir Charles Langley arrives from the south, the road swinging west so his forces approach from the east of Farren Mill.  He has two units of foot from Brindley plus cavalry in the form of the First Stourwold horse and the Penfield Light Horse. He advances in standard formation with one cavalry unit on each flank.

Neither force is very large so this promises to be a swift skirmish and one that will decide initial ownership of Farren Mill with its useful position on the road into the Vale of Wells. Additionally, victory for Langley would grant him access to other potential towns. Victory for Kirby would free Lord Stirling to move on the neutral town of Turnwall and possibly on to Stanport.

Kirby sends his Raffham Scout Cavalry into the town to seek out Langley's forces. At the same time, Langley orders Sir Miles Wolfden to take the Penfield Light Horse and ensure that the churchyard is clear of any artillery or other firing position and then proceed down the lane to the town.
The Stourwold Horse, meanwhile, cross the river and enter the town, encountering the Raffham Scout Horse whereupon a swift skirmish occurs.
In the centre of the field, the two Brindley foot units approach the position now held by the Stanton Brimard 1st foot.
Realising that the Raffham Scout Cavalry were no match for a full cavalry unit, the Raffham retreated, drawing the Stourwold Cavalry in pursuit. This allowed the artillery to fire on the Stourwold but the shots went wide. The Farren Mill Reserve then interposed themselves forcing the Stourwold horse to stop and melee while the Raffham Scout horse halted and rallied.
The foot units moved in, firing muskets with little effect. The Stanton Brimard 2nd foot swung about and approached from the north while the 1st foot held position on the lane, using the trees and slopes as cover. The Penfield Light Horse having entered the churchyard unopposed, swung around the church and entered the lane.
This forced Langley to order the Brindley 1st Foot to turn and engage the approaching Stanton Brimard 2nd, thus losing his temporary advantage in numbers in the centre. A long struggle then ensued between the units engaged, even when the Penfield Horse rode by, raking the Stanton Brimard 1st with pistol and blunderbuss fire.

Slowly, as men tired and wounds were taken, the Stanton Brimard 1st started to push the Brindley 2nd back. The Stanton Brimard 2nd did not fare as well, however, as they were losing the pushing and shoving match with the Brindley 1st. The Brindley 2nd retreated into the town.

At the same time, the Farren Mill Reserve, which had been losing ground against the Stourwold Horse but had held, because Kirby was present to rally them, now broke and fled the field altogether. The Stourwold Horse went after them and also left the field.  By this time, the Penfield Light had arrived and halted to get into good order. They now clashed with the Raffham Scout horse which was protecting the artillery.  Once again, the guns failed to make any impression on the advancing Penfield unit which took some minor wounds from grapeshot but were not affected.

In the town, General Langley, mastermind of the 1st Civil War tried to rally the Brindley 2nd but his words seemed to cause the already panicked unit to lose it's way altogether and the men broke and ran for the road out of the town. Langley, seeing he would be exposed by this event, withdrew from the field.
A similar scenario was being enacted just west of this where the Raffham horse were pushed back and General Kirby retreated with the remainder of that unit pursued for a short distance by the Penfield Light.
The Brindley 1st had succeeded in forcing the Stanton Brimard 2nd to break and retreat but when Sir Clive Camberwell, veteran of the first war rallied the Stanton Brimard troop, it turned to face the Brindley 1st again. 
Seeing that they had no support and that their commander was leaving the fray, Major William Clayton ordered the Brindley 1st to back off and they then marched off the field in good order. The Stanton Brimard 2nd remained near the church, glad not to have to fight on. They had taken losses and most of the men were desperately tired.

The battle was inconclusive but Farren Mill remained in Parliamentary Democrat hands. Both generals retired to consider their next move. Sir Lyall Wetherick, having fled with his reserves, eventually turned up at Raffham with little more than his horse and weapons.